Living in Nature: Beautiful Wood & Stone Bungalow Home

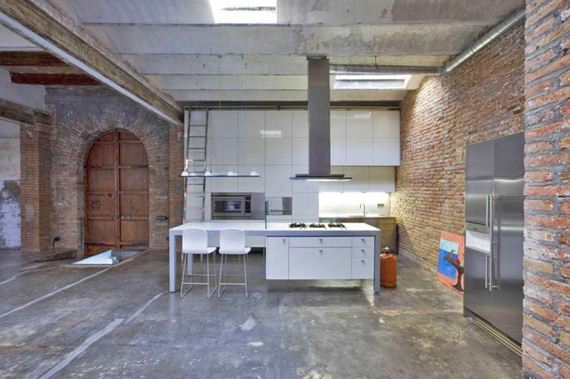
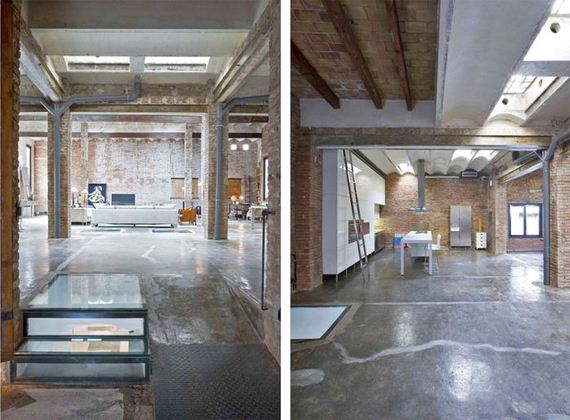
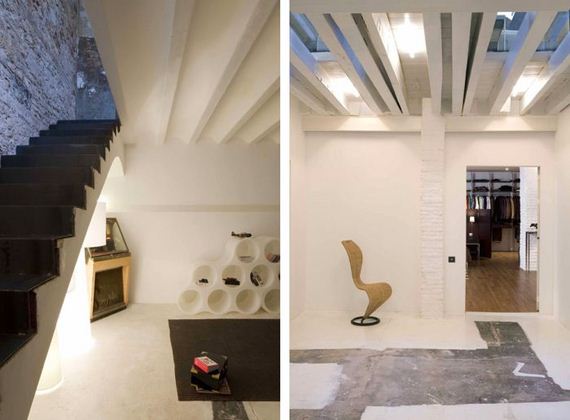
Outside and inside slide seamlessly together in this lovely little loft built of thick wooden beams, textured limestone floors and rough stone walls, all tied together by thin and unobtrusive steel members and spanned, when necessary, with crystal clear glass.

Designer Fernanda Marques’ core idea involved tying together a classic country villa with the rigorous Modernism of masters like Mies van der Rohe, weaving a series of boxy rectangular forms into their environment on the outskirts of Sao Paulo, Brazil.

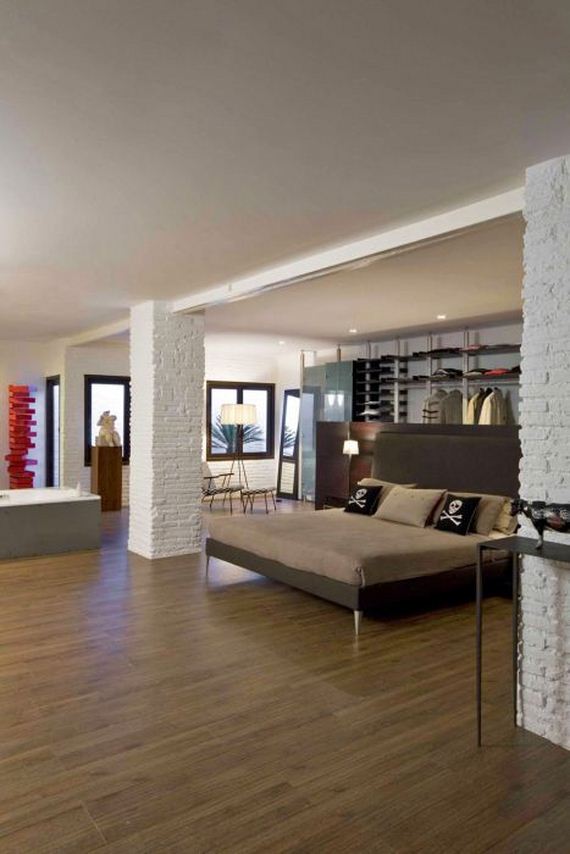
Wooden browns are a recurring theme, from wall-wide bookcases to smaller shelves, side tables, sofas, sheets, Â blankets and cushions, both within and without the thick-walled central library space.

A heavy stone table, built-in niches, cabinets and bookcases also blur the boundary between furniture and architecture, projecting into and out of walls and adding a rich layer of variegated materials to the already-organic interior design.

Why Your Green Home Improvements Aren’t Paying Off

By: Karin Beuerlein

Forget big savings on your energy bills if you make green home improvements. Instead, choose green retrofits and home improvements that offset rising energy prices.

Eco Friendly Home Improvements Sustainable Home ImprovementsInsulating your home, including the attic, can shave up to 10% off your energy bills. Image: CertainTeed

If you made green home improvements over the last few years with high hopes for lower energy bills and a quick recoup of your initial investment, you got an awakening: Your monthly bottom line likely held steady—or, worse, went up.
Before you shun green, recalibrate your thinking from expecting fat returns to understanding the new bottom line: Smart retrofits help you hold your ground against rising energy costs.

Why have my green home improvements fallen flat?

Energy prices as a whole have gone up over the last decade, especially in certain regions of the country.
Although natural gas prices have dipped a bit since 2008 and electricity prices have stayed level, the trend line goes up for both from 2011 forward.
The U.S. Energy Information Administration estimates an average annual increase in residential energy costs of 2.3% through 2035.
So…if energy cost projections hold, and assuming an average annual American energy bill of $2,200, you’ll pay 2.3% more each year (that’s $50 the first year) if you do nothing to reduce your consumption. Your bill will inch closer to $4,000 by the year 2035. Ouch.

3 energy saving retrofits that pay off

If the only reason you’re making retrofits is to manage energy costs, look for projects with maximum bang for the buck.
Rule of thumb: Try to beat the 2.3% annual average with green home improvements that reduce your energy consumption by 5% or more but have a modest initial investment. And don’t forget to ask whether your utility or state government offers rebates or tax credits for these improvements.

1. Seal and insulate ductwork that runs through unheated spaces—the attic, a crawl space, a garage. It’s not glamorous, but it can improve the efficiency of your heating system by 20%—a 5% bill reduction overall. If you hire an HVAC pro for this job, you’ll invest a few hundred dollars for labor and materials.

2. Buy a programmable thermostat. Is it possible you haven’t done this yet? For just $25 to $250, the you can save, on average, around 8% on energy bills simply by programming it properly.

3. Add attic insulation and seal air leaks. One of the best energy-saving improvements out there, because insulating and sealing your home can reduce your energy bills by 10%. Upgrading your attic insulation to the R-value recommended for your region costs anywhere from $.25 to $1 per square foot, including materials and labor; it’s less if you do it yourself.

But you won’t get the maximum savings if you don’t seal air leaks, so plan this as a combo job. Caulking and weather-stripping typically costs from $50 to $350, depending on the size of your house.

The top 10 best college towns for real estate investors

boston skyline aerial The top 10 best college towns for real estate investors

Aerial view of downtown Boston and the harbor, photo by Kevin Tostado.

Investing across America

Recently, AGBeat columnist Jeff Brown extolled the virtues of investing in Texas and CondoDomain.com President Hoyt Morgan named Washington D.C. as the top city for investing.

There are many reasons a city can be seen as a quality location for investment, and today in the spirit of school starting, we look to Move.com‘s list of Top 10 Best Back to School Real Estate Investment Cities, giving Boston the top spot.

“Pahk the cah in Hahvad Yahd”

top 10 cities The top 10 best college towns for real estate investors

So why did Boston take the cake? According to Move:

With a median list price of $335,000 in June 2011, the Boston/Cambridge market has one of the higher median list prices of the bunch, but also has high renter demand from students at over 50 colleges including Harvard and MIT, ranked two and four. The median list price in Boston has dropped by 2.62% since last June. Average rental rates in Boston in June 2011 ranged from $3,122 for a two bedroom to $3,913 for a three or more bedroom unit, both higher than a mortgage payment of around $1,370 for a median-priced home with a 20% down payment and current mortgage rates for a 30-year fixed loan. Boston was also named one of the top 10 turnaround towns by CNN Money in May 2011.

“In Cambridge and some of the Boston Proper neighborhoods we have been seeing rents rising with demand and projections of further increases of up to 25%,” said Boston-area broker owner Paul Turcotte.

Investors will soon outnumber traditional buyers

According to the recent Move, Inc. investor survey, “In the next two years, real estate investors are expected to outnumber traditional homebuyers in their local markets by three to one, and 56.5 percent plan to put their investments to work as rental properties.”

“Local markets with universities or colleges can be an attractive option for many local real estate investors,” said Move, Inc., Chief Executive Officer, Steve Berkowitz. “Housing demand in college towns is generally high and vacancy rates are usually low. Combine the supply and demand ratio with rising admissions and the five percent rise in rental rates expected by the end of the year, and rental property in college towns can be a smart option for the right investor.”

Music Review: Peter Cincotti “East of Angel Town”

peter cincottiWhile visiting Edmonton this summer, my friend Don, played me a couple of tunes from “some Foster guy”. When David Foster produces an artist, it’s hard not to pay attention. As soon as I came home, I looked for the CD. The pop ghosts most obviously haunting the CD are those of a young Billy Joel and even younger Elton John. There’s even a little Dave Grusin from the “The Firm” soundtrack (one of the greatest of all times… in my opinion).

On East of Angel Town, Cincotti blazes through an assortment of moods and tempos. He isn’t scared of letting his listeners peak into his heart and see what he’s thinking and feeling, but that’s not to suggest that his music is confessional. Rather, Cincotti is a storyteller. “Angel Town” is an upbeat ode to the place that Cincotti loves, while “Lay Your Body Down Goodbye Philadelphia” is a quiet, serious and thoughtful meditation that’s worth a listen.

He artfully addresses the perverse glamorization of violence on “Make It Out Alive”, the numbing effects of over-privileged upbringings with “Broken Children”, the pressure to succeed on a grand scale on “Another Falling Star”.

“December Boys” is led by its piano melody and grand sonic gestures. Cincotti again ruminates on life as he sees it, knows it and lives it. He is a thinker who uses his lyrics as the vehicle for letting stories unfold, and he effectively sweeps the listener up into his world and his thoughts with this methodology. He’s not as vivid or as detailed as say, Billy Joel, but he gets the job done and still ensnares his audience, not so much by what he says, but how he says it. With Cincotti, it’s all about the delivery of the message; the content of the message is there, and it’s balanced out by the package in which he wraps it.

10 Steps for Boomers Approaching Retirement

Baby boomers are used to shaking things up. Due to their large numbers and political activism, boomers have transformed America at every stage of their lives.

Born between 1946 and 1964 and numbering more than 76 million, boomers are the largest generation born in America so far.

Doing well in the prosperity that followed World War II, Baby boomers have a reputation of being big spenders and poor savers.

Now the Great Recession has hit many baby boomers hard. They’re dealing with decreased value in their retirement funds and homes and job layoffs. As a result, the number of baby boomers who are ill-prepared for retirement is increasing.

If you’re a baby boomer who wants to retire, here are 10 tips to help you figure out today’s retirement challenges:

1. Estimate your Retirement Income and Expenses.

It’s important to have a realistic plan for retirement. If you don’t have a budget now, keep track of your expenses for several months to see where your money goes. Based on the figures, make a budget. Be sure to include money to set aside for an emergency fund of at least three to six months of living expenses. Use the pre-retirement numbers to develop your retirement budget. Remember to include things that will change with retirement such as no commuting costs, less money spent for clothes and shoes, and fewer meals out. Estimate your income in retirement as well. See Mint’s Create a Budget for information on how to set up a budget.

2. Decide When to Retire.

After you’ve looked at your projected retirement income and expenses, you’ll have a better idea about when you can retire. Part of this decision is estimating what you think the rate of inflation will be and taking a guess at how long you’ll live. Figuring out what percentage of your pre-retirement you want to live on also is important. You can find online calculators to help you or you may want to hire a certified financial planner to advise you. See the Certified Financial Planner Board of Standard’s website to locate a planner near you.

3. Keep Working or Start a Second Career

If you’ve planned to retire at age 62 or 65 but find your estimated retirement income isn’t adequate to provide the lifestyle you want, continuing to work or finding a new career are two options. In a recent study, workers in their 50s said they are likely to have to delay their retirement due to the recession, a Pew study reports.

4. Decide When You’ll Start Taking Social Security Payments.

If you decide to take your Social Security benefits at age 62 or 65, you’ll receive lower monthly payments than if you work longer. The date to receive full Social Security benefits increases annually. For example, if you’re a baby boomer born between 1946 and 1954, your full retirement age will be 66 years. If you’re a boomer born in 1960 or later, your full retirement age will be 67. Baby boomers should work until their full Social Security retirement age, or better yet until age 70, Eleanor Blayney, CFP, spokeswoman for the Certified Financial Planner Board of Standards, said in an email. If married, the higher paid spouse should delay retirement until age 70, Blayney said. See the Social Security Administration’s Benefits Calculators to estimate your potential benefit amounts using different retirement dates and levels of future earnings.

5. Decide Where You Want to Live.

If you’re like most baby boomers, you want to age in place. A new trend that could help you achieve this goal is the emergence of Neighborhood Villages. In these membership organization, older citizens are assisted by their neighbors so they can stay in the homes as they grow older. See the Village to Village website for information on where the villages are located or how to set one up. Another positive development for boomers who don’t want to move is the inclusion of provisions in the recent health care reform law to help older adults stay in their homes longer. While staying put is desired by most boomers, some may want to move to be near their children or to enjoy warmer weather. If you plan to relocate, do thorough research to find out the cost of living in the area, what medical facilities are available, and what the amenities are. If you need to make significant savings for your retirement, Blayney suggests taking a look at where you live and how much house you really need.

6. Pay off Credit Cards and Mortgage.

Since your income will be lower in retirement, it’s a good idea to get rid of much debt as you can before you leave your job. This will give you more flexibility with your cash flow and tax planning. While many Americans are challenged by credit card debt, it hits seniors particularly hard. Bankruptcies among seniors are rising sharply, driven largely by credit card debt, a study by the University of Michigan Law School shows.

7. Get to Know Medicare.

Begin gathering information about Medicare before you’re ready to retire. You’ll also need to buy Medigap insurance because Medicare only covers basic services. Be prepared to do research on Medicare and Medigap insurance. Both are complicated.

8. Learn About Long-Term Care Insurance.

Medicare and private insurances don’t pay for the majority of long-term care costs, the costs for nursing home care. You need to evaluate many factors when considering whether to buy this insurance: your health; whether the elders in your family went to nursing homes or died suddenly; whether you can afford the insurance; and if you want to leave money for your children. See this AARP fact sheet for details.

9. Plan for Out-of-Pocket Medical Costs.

Set money aside for medical costs not covered by Medicare or private insurance in short-term bonds or money markets. You could incur as much as $200,000 to $300,000. If you still have several years until retirement and are reasonably healthy, consider a high-deductible health insurance policy and set up a Health Savings Account for accumulating funds for these out-of-pocket costs in retirement, Blayney suggests.

10. Examine your Emotional Portfolio as well as your Investment Portfolio.

Baby boomers are a diverse group and their task during retirement is to find their path, Nancy K. Schlossberg, professor emerita at the University of Maryland and author of the book Revitalizing Retirement, said in an interview. The transitions of retirement aren’t easy. “It takes a while to get a new life.” Retirement is a challenge for many baby boomers. With these 10 steps boomers can begin to look at their spending and set goals for retirement.

Rita R. Robison is a consumer journalist who blogs at The Survive and Thrive Boomer Guide. Rita blogs via Contently.com.

The Case-Shiller Index. Is it worth watching?

I am not a fan of the U.S. housing index created by Karl Case and Bob Shiller (in the early 1990s). That said, it is a highly watched gauge and worthy of commentary.

It is worthwhile discussing briefly exactly what is tracked and how it is put together. The indices are calculated from data on repeat sales of single-family homes; that is the sale of the same house over time (it therefore ignores the new construction market completely). The Case-Shiller index family includes 20 metropolitan area indices and two composite indices as aggregates of the metropolitan areas. These indices are three month moving averages and data is published with a two-month lag.

My biggest concern with the Case-Shiller report is really a local one. Since I am based in the greater Seattle area, which is one of the “cities” within the index. My issue is that Case-Shiller defines Seattle as the tri-county area – encompassing King, Snohomish, and Pierce Counties. In most people’s opinions, this is far too large a geography to have any real relevance. The markets in these three counties vary significantly from each other, so to define what is taking place in Seattle using sales activity in Tacoma and Everett seems ridiculous to me.

So, what’s happening today?  Well, as the explanation above states, there is a two month delay by the time the report is released, so the question really isn’t what is happening today, but rather what was happening for the three months between March and May of this year.

Overall, prices rose by one percent from April which is a positive sign. Prices rose in 16 of the cities; they fell in Detroit, Las Vegas, and Tampa, Fla., and were unchanged in Phoenix. The rise in May for Case-Shiller came after the index edged up a fractional 0.6 percent in April, which was the first time prices were higher in eight months. In Portland the index increased by 1.2% and, in Seattle, by 1.1%.  We saw increases in all of the Californian markets, with San Francisco rising by 1.8%, Los Angeles by 0.5% and San Diego rounding out the three with a 0.2% increase.

More than ever, drilling down to the hyper-local market is imperative to making sound decisions. Everyone wants to know when we’ve hit the bottom of the market. I don’t believe that should be our quest. Timing any market is almost impossible, just look at what happened to the Dow over the past few days. Choices in real estate must not be made in a vacuum, as needs change, a property that best suits that change, should be considered. There is no such thing as a “sure” thing. Doing what’s best, with the best intent, with eyes open, is how we should move forward.

How to Hang Pictures Without Destroying Your Walls

Whether you rent or own, you probably want to put some art on the walls and spice up your space. You also probably want to do this without damaging the walls trying to hang the same photo five times or having it fall down over and over again. Here’s how to hang your art and posters the right way the first time without wrecking your walls in the process.

How you should hang art on the way depends largely on how heavy and large the poster or frame you want to put up actually is. Still, the key to hanging photos without killing your walls starts with planning, long before you put the first nail in the wall or drill the first hole.Photo by David Hunter.

How to Hang Pictures Without Destroying Your Walls

Plan Ahead

Pick your space. If you don’t already know where you want to hang your art or posters, now’s the time to start looking and making sure that the space you want your art to hang is large enough to accommodate it. Also, make sure you’re not cramming so many frames, photos, and posters in such a small space that you can’t manage them or space them evenly. Photo by Robert Taylor.

Hang at eye-level. One design tip that will help you maximize the use of your wall space without losing sight of your art is to always hang your art at eye-level where you’ll be able to see them without having to crane your neck up or look down your nose to see what you’re hanging on the wall. If you don’t want to eyeball what “eye level” is, run a tape measure from the floor to the ceiling, and have someone else mark on the measure where your eyes naturally rest when you’re standing a foot or two away from the wall.

Get a stud finder. While you may not need to hang light posters in acrylic or plastic frames or photographs from a stud, if you do have an expensive piece in a heavy frame, you should know where the studs behind your walls are. Even if you don’t need your studs for your artwork, take a stud finder and mark-perhaps at the top of your wall where it meets the ceiling-where the studs are with a pencil. Then you’ll never need to worry again.

Mount the Hardware

Measure first. Make sure you mark off any places you need to hammer nails or drill holes for brackets before you try to hang the piece. Use a straight-edge, ruler, or level to make sure the sides are level before you actually hold the art up to the wall. Mark the center line (the halfway point between the bottom and the top of the art, which should also rest at eye-level,) the edges, and all the sides. When you’re finished, putting the art up should be like fitting a puzzle piece into a slot. Making sure you take the time to mark where the art will go first and that it’s level and spaced well from other pieces will save you from mounting a piece only to take it down and have to re-mount it somewhere else later.

How to Hang Pictures Without Destroying Your WallsUse the right tools. Picture hanging kits, easily available at most hardware and department stores, often have all the materials you need to hang most common frames on your walls. Light pieces like photos, movie posters, and other art will likely require just a nail, or a nail and a bracket or picture hanger (most light frames have a bracket on the back already.) Photo by Kevin Williamson.

If you’re facing something over 25lbs however, this is where you’ll be happy you marked the studs. Depending on how heavy the art is you may consider using a plastic wall anchor in the drywall, or solidly mounting the art in the stud using a mounting bracket. Don’t use drywall screws in wood, and don’t use wood screws in drywall – go to your local hardware store and find the type of picture hanger for the size and weight you’re dealing with. Using the wrong mounting brackets or tools will inevitably lead you to waking up in the middle of the night to the sound of your art crashing to the floor.

Use blank paper for dummy art. There’s no need to try and hold your art or frame up to the wall while simultaneously marking or drilling holes in it. Put the art on the floor, and lay notebook or construction paper around the edges, then tape the paper together so you have a large sheet that’s the same size as the piece you want to hang. Then use the sheet, now the same height and width as the art, as a guide that you can tape to the wall to mark your holes or even drill your holes through the hanging paper without worrying if you’re in the right spot.

How to Hang Pictures Without Destroying Your Walls

Mount the Art

Once you’ve measured, centered, and mounted your hardware, placing the art on the wall should be a simple task, and you shouldn’t have to spend too much time tilting the art to make sure it’s level. You can save the paint on your walls from scuffs and scratches though by adding small adhesive bits of felt to the corners or bottom of the frame where it’s in direct contact with the wall. If you don’t have anything like that, a bit of post-it note or masking tape will work too: anything to keep the frame from scraping against the wall directly. Photo by Horia Varlan.

Bonus Tip: Use Disposable Hooks

3M’s Command line of plastic and metal hooks also work well to hang light pieces of art and posters from drywall or concrete, without the need for drills or nails. Apartment dwellers in rental units, college students, or anyone else who’s technically prohibited from hammering or drilling will find them especially useful. The adhesive strips that come with Command hooks go on easily, cure quickly, and remove without damaging the walls (in most cases,) which is a huge benefit if you like to change out the art on your walls frequently, or just don’t want to risk drilling or hammering nails into them.

The trouble with these kinds of disposable hooks, Velcro strips, and other mounting strips is that they’re generally rated for very light objects. If you have small, light plastic or acrylic frames with photos or printed posters in them, they’ll work well. If you have a solid wood frame or oversized pieces of art, they may hold for a few days, but your art will come clattering down unless you use three or four hooks to hold it up.

Hanging a picture shouldn’t have to be so hard that you’re worried about damaging your walls in the process. With a little preparation, you can do it right the first time and hang your artwork easily, without ending up with multiple nail-holes in your wall that you subsequently have to patch up or cover with the art you hung.

What are some of your best art and photo-hanging tips? How do you decorate your walls without wrecking them? Share your tips in the comments below.

From a Warehouse to a Modern Loft

Amazing transformation from a ordinary warehouse to  a beautiful modern loft located in Barcelona, Spain.

b566

b566

b566

b566

b566

b566

b566

b566

b566

b566

b566

Creative Architecture Designs

Good architecture is a way to impress people. There are some buildings and sculptures that really don’t seem real, being as impressive as they are. Sometimes you might think it is impossible for a building to look like that, as some models look so twisted. Of course besides them having weird shapes and designs, architects have to think about their usability and safety.

Architecture might seem rigid from the design point of view, because of the factors I have already mentioned, but creative people always find a workaround and they make their creations fun and at the same time safe to use. This is why they are up to break all the rules and go for something impressive and strange at the same time. Check out a series of photos depicting amazing architectures from all over the world. I myself was impressed to be honest.