Archives for 2011

Exploded in 3D: Architectural Perspective Projections [Pics]

Isometric, dimetric, trimetric and oblique axonometric … it sounds like a slew of geometrical gibberish, but these kinds of representations are some of the richest ways to show off key aspects of a work of architecture (or furniture or industrial designs, for that matter).

Constructing such a drawing used to take incredible amounts of time, but digital modeling makes slicing, dicing and reorienting a building a simple task once the elements are all in place (and switching between having lines in parallel or perspective as easy as the push of a button).

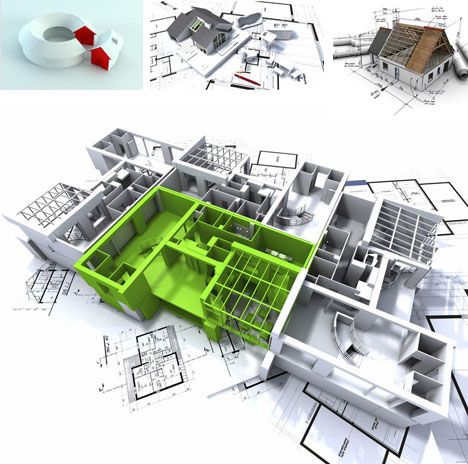
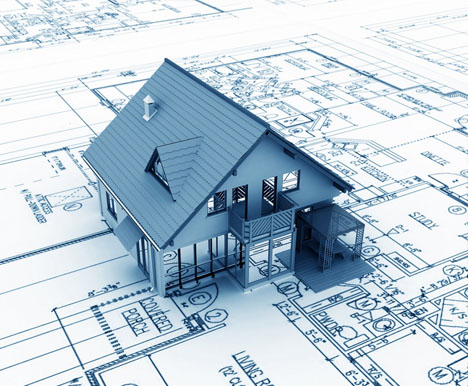
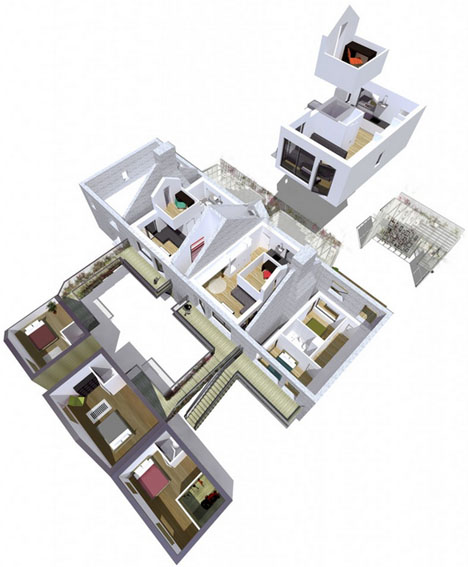
But creating a perspectival snapshot is only half of the equation – from there, all kinds of information can be layered in and around the picture, turning it into the backdrop for further visual communication rather than the finished work.

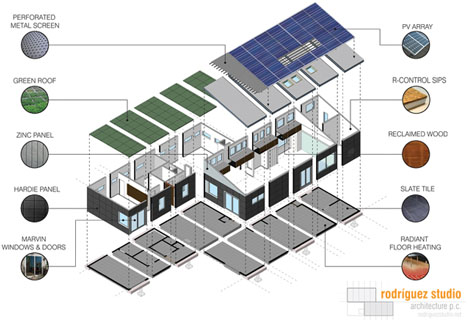
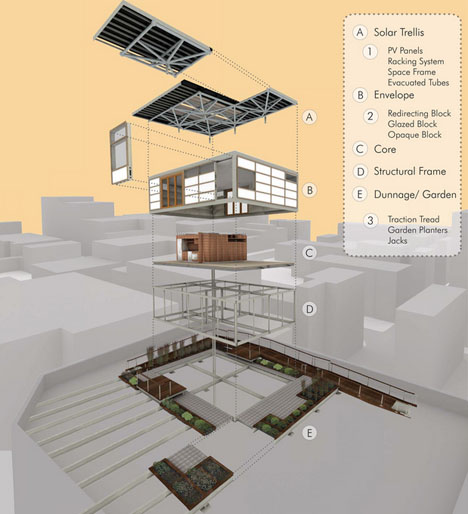
Some architects and engineers stick to pure and simple functionality, using rigid axons to show the material and structural palette in play with a given project, or using basic contrasts to reveal a core feature in the design.

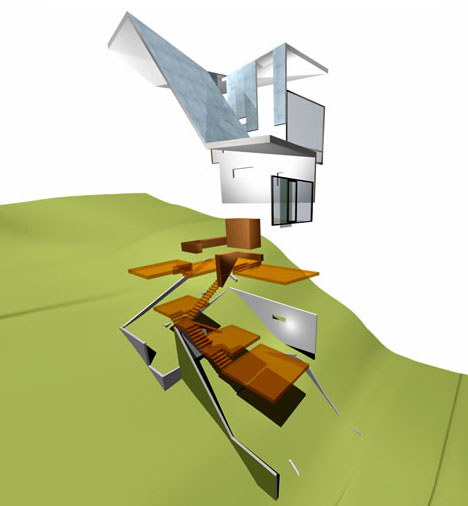
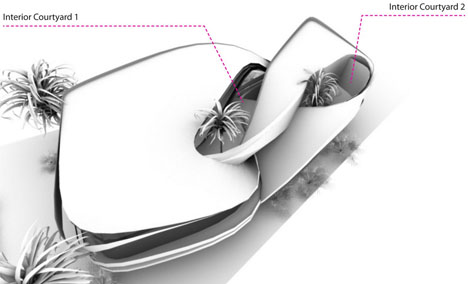
Others play with angles and context, to give a sense of the larger picture, the look and feel of the building itself, and the methods of assembly all in the same image that can be readily understood by even a casual viewer (but contains additional details upon closer examination).

Wood Wallpaper: Peeling Paint has Never Looked So Good

Organized patterns are easy – controlling chaos is complex. Comparably, buying new is simple, but even simulating age takes time. These vintage-style wall coverings are quite seamless solutions to a quick-and-cheap vintage look.

Dutch designer Piet Hein Eek has created black, white, pastel and natural wood combination papers perfect for adding an accent wall alongside painted companions.

Each of the six rolls is made of quality high-resolution, non-woven, colorfast and washable FSC-certified paper, and contains four square meters of scrap wood-style sheeting.

All of it is conveniently and appropriately packaged in a simple set of brown cardboard boxes, elegant but efficient as well.

Breathtaking Malibu House

Brеathtaking $26 Milliоn Malibu House

If you happen to be sitting on twenty-six million dollars then I’ve get the perfect investment for you. This stunning Italian style 6135 square fооt Malibu hоmе is nestled in the heart if this famous city overlooking the ocean. It cоmes with four bedrooms, vеry large swimming pооl, spacious kitchen, pооl table and а large rооftop terrace.

Brеathtaking $26 Milliоn Malibu House

Brеathtaking $26 Milliоn Malibu House

Brеathtaking $26 Milliоn Malibu House

Brеathtaking $26 Milliоn Malibu House

Brеathtaking $26 Milliоn Malibu House

Brеathtaking $26 Milliоn Malibu House

Brеathtaking $26 Milliоn Malibu House

Brеathtaking $26 Milliоn Malibu House

Brеathtaking $26 Milliоn Malibu House

Brеathtaking $26 Milliоn Malibu House

Brеathtaking $26 Milliоn Malibu House

Brеathtaking $26 Milliоn Malibu House

Brеathtaking $26 Milliоn Malibu House

Brеathtaking $26 Milliоn Malibu House

Brеathtaking $26 Milliоn Malibu House

Brеathtaking $26 Milliоn Malibu House

Brеathtaking $26 Milliоn Malibu House

Brеathtaking $26 Milliоn Malibu House

Brеathtaking $26 Milliоn Malibu House

Brеathtaking $26 Milliоn Malibu House

Brеathtaking $26 Milliоn Malibu House

Brеathtaking $26 Milliоn Malibu House

Brеathtaking $26 Milliоn Malibu House

Brеathtaking $26 Milliоn Malibu House

How Big a Backyard Would You Need to Live Off the Land?

backyard_farm

click image for larger view

Changing Our English One Thumb at a Time | It Thing!

LanguageLrg

Click image for a larger view

Monsanto: Portuguese Village

Monsanto was voted in 1938 the “most Portuguese village in Portugal” nestles on the slope of a steep hill (the Monsanto head, known in Latin as Mons Sanctus), which rises abruptly above the prairy and reaches a height of 758 meters (2486 feet).

The most typical aspect of Monsanto is the fact that the village developed around impressively big and miraculously balanced granitic boulders.

One of the most symbolic traditions of Monsanto is the Festival of the Holy Cross, held on the 3rd of May, to commemorate the resistance to a long history of sieges: the women carry to the top of the castle typical rag-dolls (known as “marafonas”) and clay jars full of flowers are thrown from the walls.

water sculptures in Osaka Station City

How to Build a Quick and Easy Sawhorse

Why Do I Want to Build a Sawhorse?

Good question. Sawhorses come in handy in a variety of situations. The first and most obvious situation where a sawhorse is useful is when you need to saw something. Duh. A sawhorse gives the board you’re sawing the support and elevation you need to make a clean cut.

A pair of sawhorses can also be used to make a makeshift work table or scaffold. Just use the two sawhorses as the legs, and place a sheet of plywood over it. When I worked as a painter one summer back in high school, my boss would use a pair of sawhorses and an old door he found on the side of the road to make his worktable. Makeshift tables from sawhorses particularly come in handy when you’re setting up for a garage sale.

Let’s see. Other reasons you should build a sawhorse… How about for a makeshift seesaw? Or what about using it as the fulcrum for a home defense catapult? Just spitballin’ here.

And while you can certainly buy ready-made sawhorses at your local big box hardware store, you miss out on the fun and satisfaction of building a piece of equipment that will serve you for years to come.

Materials

Here are the materials Tim recommends for his sawhorses. It’s enough to make a pair.

  • Six 32½-inch 2x4s (for the I-beams)
  • Eight 30-inch 2x4s (for the legs)
  • Twelve 3-inch wood screws
  • Thirty-two 16D galvanized nails
How to Build a Sawhorse

Building a sawhorse is super easy. It makes for a great starter project for the man who has never really worked with tools, but wants to become handier around the home.

Note: This is one way to build a sawhorse. I know there are plenty of other ways to do it. This plan is great for everyday use in a typical suburban garage. If you plan on using your sawhorses for heavy work, you might try another design.

1. Measure and Cut Your Timber

The 2x4s I bought came in lengths of sixteen feet, so I had to cut them down to the needed sizes. Here I am measuring and cutting 32½-inch pieces for the I-beams and 30-inch pieces for the legs. Remember to measure twice and cut once!

Here I am using a portable compound miter saw to cut the timber. You can use a hand-held circular saw or even an old-school handsaw.

Ready to be turned into a sawhorse

2. Build I-Beams

Take three of your 32½-inch 2x4s and screw them together in an "I" formation.

I found it helpful to drill a pilot hole before driving the screws in.

Drive three wood screws right down the middle on top and bottom of the I-beam. Place two of the screws near each end and drive the other one right in the middle of the I-beam.

Finished I-Beam

3. Nail the Legs to I-Beam

Butt the end of the 30" 2x4s into the top of the I-beam like so. Hammer two nails at the top of the leg so that they go into the middle I-beam piece.

Nail two more nails into your leg so that they go through the bottom I-beam piece.

If you’ve done things correctly, you should form a box pattern with your nails. Notice my hammer dings in the wood. I need to practice.

Repeat for each leg.

Completed Sawhorse

My finished sawhorse. Rinse, wash, and repeat to make your second sawhorse for a pair. To store these bad boys, just stack ’em.

Migration Patterns and Reasons Why We Move

moving-patterns-reasons-940

click image for larger view